As organizations adopt modern device management strategies, Microsoft Intune plays a key role in securing endpoints. One underutilized but powerful feature you can manage via Intune is AppLocker - a native Windows tool that lets you control which applications users are allowed to run.
In this post, I’ll show you how to deploy AppLocker policies using Microsoft Intune to block unauthorized .exe files, especially from risky locations like the Downloads and Desktop folders.
What is AppLocker?
AppLocker lets you control which apps users can run on their computers. If you're not familiar with how to create these rules - especially for blocking apps in the Downloads or Desktop folders, check out my earlier post:
That post walks through the full policy creation process, so here we’ll focus only on how to deploy them through Intune.
Prerequisites
- A valid Microsoft Intune (Microsoft Endpoint Manager) setup
- Devices enrolled in Intune
- A pre-configured AppLocker policy exported as an XML file
Steps to Deploy AppLocker via Intune
🔹 Step 1: Export Your AppLocker Policy as XML
Create and export your AppLocker policy from a reference device using the Local Security Policy Editor. (See previous post for how to create the policy).
- Export the policy via: Right-click AppLocker > Export Policy
- Save it as AppLockerPolicy.xml (Use any name as preferred)
🔹 Step 2: Create the Custom Profile in Intune
- Go to Intune Admin Center
- Navigate to: Devices > Configuration profiles > Create > New Policy
- Choose: Platform: Windows 10 and later / Profile type: Template > Custom
- Add a new OMA-URI setting:
- Name: AppLocker Policy
- OMA-URI: ./Vendor/MSFT/AppLocker/ApplicationLaunchRestrictions/Apps/EXE/Policy
- Data type: String
- Value: Paste the escaped XML content
Assign the profile to your target device group and save it. Once devices sync, the policy will apply.
*It is recommended to use one OMA-URI setting for one row for easy troubleshooting.
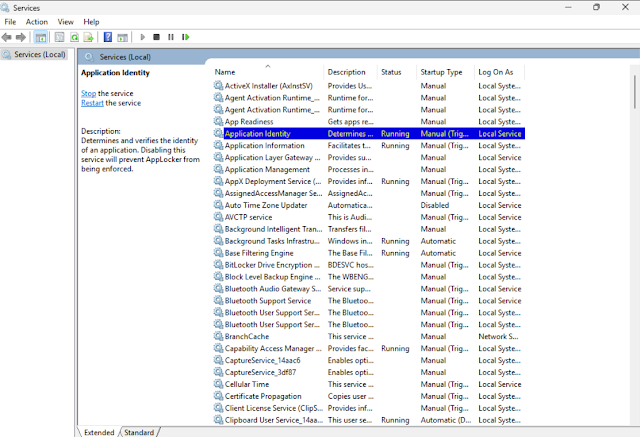
🔹 Step 3: Ensure Application Identity Service is Enabled
AppLocker needs the Application Identity service running to enforce rules. Make sure the service is running using Services.
If it is not running, enable it manually or use the below PowerShell script via Intune to make sure it’s enabled:
- Set-Service -Name AppIDSvc -StartupType Automatic
- Start-Service -Name AppIDSvc
🔹 Step 4: Verifying Deployment
Check Intune to Monitor the deployment:
Review the deployment status and identify any issues.
On a test device, try launching a .exe file from the blocked folder.
You should see an access denied message like:
"This app has been blocked by your system administrator."
Check Event Viewer:
- Open Event Viewer (eventvwr.msc).
- Navigate to Applications and Services Logs > Microsoft > Windows > AppLocker.
- Check logs under EXE and DLL, MSI and Script, and Packaged app-Deployment.
- Event ID 8004: Blocked application.
- Event ID 8003: Allowed application.
🔐 Final Thoughts
Deploying AppLocker policies via Intune is a great way to bring modern application control to your environment without relying on legacy GPO. Combined with Defender and Endpoint DLP, it forms a strong foundation for endpoint security.
Want to understand how AppLocker compares to WDAC (Windows Defender Application Control)?
Stay tuned for that in an upcoming post!


2 Comments
Helpful
ReplyDeleteThanks!
Delete